11+ Year IT Industry Experience, Working as Technical Lead with Capgemini | Consultant | Leadership and Corporate Trainer | Motivational and Technical Speaker | Career Coach | Author | MVP | Founder Of RVS Group | Trained more than 4000+ IT professionals | Azure | DevOps | ASP.NET | C# | MVC | WEB API | ANGULAR | TYPESCRIPT | MEAN | SQL | SSRS | WEB SERVICE | WCF... https://bikeshsrivastava.blogspot.in/ http://bikeshsrivastava.com/
Saturday, January 27, 2018

Best Practices of HTML with CSS.

1: Always Close Your Tags

Back in the day, it wasn't uncommon to see things like this:

Bad:

1
2
3
<li>Some text here.
<li>Some new text here.
<li>You get the idea.
Notice how the wrapping UL/OL tag was omitted. Additionally, many chose to leave off the closing LI tags as well. By today's standards, this is simply bad practice and should be 100% avoided. Always, always close your tags. Otherwise, you'll encounter validation and glitch issues at every turn.

Better:

1
2
3
4
5
<ul>
<li>Some text here. </li>
<li>Some new text here. </li>
<li>You get the idea. </li>
</ul>

2: Declare the Correct DocType

When I was younger, I participated quite a bit in CSS forums. Whenever a user had an issue, before we would look at their situation, they HAD to perform two things first:
  1. Validate the CSS file. Fix any necessary errors.
  2. Add a doctype.
"The DOCTYPE goes before the opening html tag at the top of the page and tells the browser whether the page contains HTML, XHTML, or a mix of both, so that it can correctly interpret the markup."
Most of us choose between four different doctypes when creating new websites.
There's a big debate currently going on about the correct choice here. At one point, it was considered to be best practice to use the XHTML Strict version. However, after some research, it was realized that most browsers revert back to regular HTML when inter pretting it. For that reason, many have chosen to use HTML 4.01 Strict instead. The bottom line is that any of these will keep you in check. Do some research and make up your own mind.

3: Never Use Inline Styles

When you're hard at work on your markup, sometimes it can be tempting to take the easy route and sneak in a bit of styling.

Bad:

1
<p style="color: red;">I'm going to make this text red so that it really stands out and makes people take notice! </p>
Sure -- it looks harmless enough. However, this points to an error in your coding practices.

Better

1
2
3
#someElement > p {
color: red;
}

4: Place all External CSS Files Within the Head Tag

Technically, you can place stylesheets anywhere you like. However, the HTML specification recommends that they be placed within the document HEAD tag. The primary benefit is that your pages will seemingly load faster.
1
2
3
4
5
<head>
<title>My Favorites Kinds of Corn</title>
<link rel="stylesheet" type="text/css" media="screen" href="path/to/file.css" />
<link rel="stylesheet" type="text/css" media="screen" href="path/to/anotherFile.css" />
</head>

5: Consider Placing Javascript Files at the Bottom

Remember -- the primary goal is to make the page load as quickly as possible for the user. When loading a script, the browser can't continue on until the entire file has been loaded. Thus, the user will have to wait longer before noticing any progress.
If you have JS files whose only purpose is to add functionality -- for example, after a button is clicked -- go ahead and place those files at the bottom, just before the closing body tag. This is absolutely a best practice.

Better:

1
2
3
4
5
<p>And now you know my favorite kinds of corn. </p>
<script type="text/javascript" src="path/to/file.js"></script>
<script type="text/javascript" src="path/to/anotherFile.js"></script>
</body>
</html>

6: Never Use Inline Javascript.

Another common practice years ago was to place JS commands directly within tags. This was very common with simple image galleries. Essentially, a "onclick" attribute was appended to the tag. The value would then be equal to some JS procedure. Needless to say, you should never, ever do this. Instead, transfer this code to an external JS file and use "addEventListener/attachEvent" to "listen" for your desired event. Or, if using a framework like jQuery, just use the "click" method.
$('a#moreCornInfoLink').click(function() {
alert('Want to learn more about corn?');
});
7: Download Firebug
I can't recommend this one enough. Firebug is, without doubt, the best plugin you'll ever use when creating websites. Not only does it provide incredible Javascript debugging, but you'll also learn how to pinpoint which elements are inheriting that extra padding that you were unaware of. Download it!

8: Use Firebug!

From my experiences, many users only take advantage of about 20% of Firebug's capabilities. You're truly doing yourself a disservice. Take a couple hours and scour the web for every worthy tutorial you can find on the subject.

Resources

9: Keep Your Tag Names Lowercase

Technically, you can get away with capitalizing your tag names.
1
2
3
<DIV>
<P>Here's an interesting fact about corn. </P>
</DIV>
Having said that, please don't. It serves no purpose and hurts my eyes -- not to mention the fact that it reminds me of Microsoft Word's html function!

Better

1
2
3
<div>
<p>Here's an interesting fact about corn. </p>
</div>


10. Keep image file sizes small:

You have only a few seconds to grab the recipients attention – don’t waste it with large images that take too long to load.


Bikesh Srivastava
What is @ContentChild and @ContentChildren in Angular5 with Example

This page will walk through Angular @ContentChild and @ContentChildren decorator example. They are used to fetch first or all elements from content DOM. @ContentChild gives first element matching the selector from the content DOM. @ContentChildren gives all elements of content DOM as QueryList. Contents queried by @ContentChild and @ContentChildren are set before ngAfterContentInit() is called. If we do any change in content DOM for the matching selector, that will be observed by @ContentChild and @ContentChildren and we will get updated value. As a selector for @ContentChild and @ContentChildren, we can pass directive, component or local template variable. By default @ContentChildren only selects direct children of content DOM and not all descendants. @ContentChildren has a metadata descendants and setting its value true, we can fetch all descendant elements. Here on this page we will provide @ContentChild and @ContentChildren example using directive, component and ElementRef . Now find the complete example step by step.

Technologies Used

Find the technologies being used in our example. 
1. Angular 4.2.4 
2. TypeScript 2.3.3 
3. Node.js 6.10.1 
4. Angular CLI 1.3.1 
5. Angular Compiler CLI 4.2.4

Project Structure

Find the project structure of our demo application.

angular-demo
|
|--src
|   |
|   |--app 
|   |   |
|   |   |--app.module.ts
|   |   |--app.component.ts
|   |   |--book.directive.ts
|   |   |--writer.component.ts
|   |   |--favourite-books.component.ts
|   |   |--city.component.ts
|   |   |--address.component.ts
|   |   |--favourite-cities.component.ts
|   |   |--friend.component.ts
|   |   |--favourite-friends.component.ts
|   |   |--person.component.ts
|   |   |--person.component.html
|   |   
|   |--main.ts
|   |--index.html
|   |--styles.css
|
|--node_modules
|--package.json

@ContentChild and @ContentChildren

@ContentChild and @ContentChildren both are decorators. They are used to fetch single child element or all child elements from content DOM. Let us understand more about it. 

@ContentChild

@ContentChild gives the first element or directive matching the selector from the content DOM. If new child element replaces the old one matching the selector in content DOM, then property will also be updated. @ContentChild has following metadata properties. 
selector: Directive type or the name used for querying. Find the example when type is directive.

@ContentChild(BookDirective) book: BookDirective; 
read: This is optional metadata. It reads a different token from the queried element. 

@ContentChildren

@ContentChildren is used to get QueryList of elements or directives from the content DOM. When there is change in content DOM, data in QueryList will also change. If child elements are added, we will get those new elements in QueryList. If child elements are removed, then those elements will be removed from the QueryList. The metadata properties of @ContentChildren are as follows. 
selector: Directive type or the name used for querying. Find the example when type is directive.

@ContentChildren(BookDirective) topBooks: QueryList<BookDirective>
descendants: This is Boolean value. When it is true then direct children and other descendants will also be included. If the value is false then only direct children will be included. descendants is used as follows.

@ContentChildren(BookDirective, {descendants: true}) allBooks: QueryList<BookDirective>
The default value of descendants is false
read: This is optional metadata. It reads a different token from the queried element.

Using AfterContentInit

AfterContentInit is a lifecycle hook that is called after directive content is fully initialized. It has a method ngAfterContentInit(). This method runs after angular loads external content into the component view. This method runs once after first ngDoCheck() method. Contents queried by @ContentChild and @ContentChildren are set before ngAfterContentInit() is called. AfterContentInit is used as given below.

@Component({
  selector: 'friend',
  template: ``
})
export class FriendComponent implements AfterContentInit {
 @ContentChild('name') nameRef: ElementRef;
 ngAfterContentInit() {
    console.log(this.nameRef.nativeElement.innerHTML);
 }
}

Example 1: @ContentChild and @ContentChildren using Directive

Find the example of @ContentChild and @ContentChildren decorators using directive. First we will create a directive with selector as element name. 
book.directive.ts

import { Directive, Input } from '@angular/core';

@Directive({
    selector: 'book'
})
export class BookDirective {
    @Input() bookId: string;
    @Input() bookName: string;
} 
In the above directive we have used two @Input() properties. <book> element can be used in any component. Now create a component to use @ContentChild decorator to query element of type <book>
writer.component.ts

import { Component, ContentChild } from '@angular/core';
import { BookDirective } from './book.directive';

@Component({
  selector: 'writer',
  template: `
        Name: {{writerName}}
 <br/>Latest Book: {{book?.bookId}} - {{book?.bookName}} 
  `
})
export class WriterComponent {
 @ContentChild(BookDirective) book: BookDirective;
 writerName = 'Mahesh';
} 
Find the code snippet of person.component.html to use <writer> and <book> elements.

<writer>
  <book bookId="1" bookName="Java 8 Tutorials" *ngIf="latestBook"></book>
  <book bookId="2" bookName="Learning Angular 4" *ngIf="!latestBook"></book>
</writer>
<br/><button (click)="onChangeBook()">Change Book</button> 
Find the code snippet of person.component.ts.

latestBook = true;
onChangeBook() {
   this.latestBook = (this.latestBook === true)? false : true;
}
Now we will create the example of @ContentChildren using directive. 
favourite-books.component.ts

import { Component, ContentChildren, QueryList } from '@angular/core';
import { BookDirective } from './book.directive';

@Component({
  selector: 'favourite-books',
  template: `
        <b>Top Favourite Books</b>
 <ng-template ngFor let-book [ngForOf]= "topBooks">
    <br/>{{book.bookId}} - {{book.bookName}}
 </ng-template>
  
 <br/><b>All Favorite Books</b>
 <ng-template ngFor let-book [ngForOf]= "allBooks">
    <br/>{{book.bookId}} - {{book.bookName}}
 </ng-template> 
  `
})
export class FavouriteBooksComponent {
    @ContentChildren(BookDirective) topBooks: QueryList<BookDirective>
    @ContentChildren(BookDirective, {descendants: true}) allBooks: QueryList<BookDirective>
} 
In the above component we are using @ContentChildren two times, one with default descendants and second with descendants with true value. Find the code snippet of person.component.html to use <favourite-books> and <book>elements.

<favourite-books>
  <book bookId="1" bookName="Hibernate 4 Tutorials"></book>
  <book bookId="2" bookName="Spring Boot Tutorials"></book>
  <favourite-books>
    <book bookId="3" bookName="Learning JavaScript"></book>
  </favourite-books>   
  <favourite-books *ngIf="showAllBook">
    <book bookId="4" bookName="Thymeleaf Tutorials"></book>
    <book bookId="5" bookName="Android Tutorials"></book>
  </favourite-books>   
</favourite-books>
<br/><button (click)="onShowAllBooks()" >
  <label *ngIf="!showAllBook">Show More</label>
  <label *ngIf="showAllBook">Show Less</label>
</button> 
Find the code snippet of person.component.ts.

showAllBook = false;
onShowAllBooks() {
   this.showAllBook = (this.showAllBook === true)? false : true;
} 
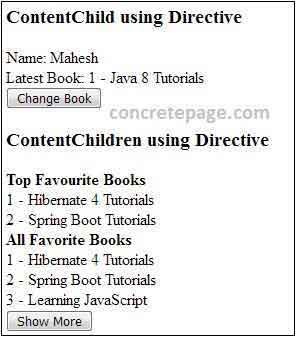
Now find the print screen of the output of @ContentChild and @ContentChildren decorators using directive.
Angular 2/4 @ContentChild and @ContentChildren Example

Example 2: @ContentChild and @ContentChildren using Component

Find the example of @ContentChild and @ContentChildren decorators using component. Here for child element we will create a component instead of directive. 
city.component.ts

import { Component, Input } from '@angular/core';

@Component({
  selector: 'city',
  template: ``
})
export class CityComponent {
    @Input() cityId: string; 
    @Input() cityName: string;
} 
In the above component, we have used two @Input() properties. Now find the component that will use @ContentChild
address.component.ts

import { Component, ContentChild } from '@angular/core';
import { CityComponent } from './city.component';

@Component({
  selector: 'address',
  template: `
        <b>{{title}}</b>
 <br/>City: {{city?.cityId}} - {{city?.cityName}} 
  `
})
export class AddressComponent {
 @ContentChild(CityComponent) city: CityComponent;
 title = 'Address';
} 
Find the code snippet of person.component.html to use <address> and <city> element.

<address>
  <city cityId="1" cityName="Varanasi" *ngIf="homeTown"></city>
  <city cityId="2" cityName="Noida" *ngIf="!homeTown"></city>
</address>
<br/><button (click)="onChangeCity()">Change City</button> 
Find the code snippet of person.component.ts.

homeTown = true;
onChangeCity() {
   this.homeTown = (this.homeTown === true)? false : true;
}
Now find the example for @ContentChildren using component. 
favourite-cities.component.ts

import { Component, ContentChildren, QueryList } from '@angular/core';
import { CityComponent } from './city.component';

@Component({
  selector: 'favourite-cities',
  template: `
        <b>Top Favourite  Cities</b>
 <ng-template ngFor let-city [ngForOf]= "topCities">
    <br/>{{city.cityId}} - {{city.cityName}}
 </ng-template>
  
 <br/><b>All Favourite Cities</b>
 <ng-template ngFor let-city [ngForOf]= "allCities">
    <br/>{{city.cityId}} - {{city.cityName}}
 </ng-template> 
  `
})
export class FavouriteCitiesComponent {
    @ContentChildren(CityComponent) topCities: QueryList<CityComponent>
    @ContentChildren(CityComponent, {descendants: true}) allCities: QueryList<CityComponent>
} 
Find the code snippet of person.component.html to use <favourite-cities> and <city> element.

<favourite-cities>
  <city cityId="1" cityName="Noida"></city>
  <city cityId="2" cityName="Mumbai"></city>
  <favourite-cities>
    <city cityId="3" cityName="Gurugram"></city>
  </favourite-cities>   
  <favourite-cities *ngIf="showAllCity">
    <city cityId="4" cityName="New Delhi"></city>
    <city cityId="5" cityName="Bengaluru"></city>
  </favourite-cities>   
</favourite-cities>
<br/><button (click)="onShowAllCities()" >
  <label *ngIf="!showAllCity">Show More</label>
  <label *ngIf="showAllCity">Show Less</label>
</button> 
Find the code snippet of person.component.ts.

showAllCity = false; 
onShowAllCities() {
   this.showAllCity = (this.showAllCity === true)? false : true;
}
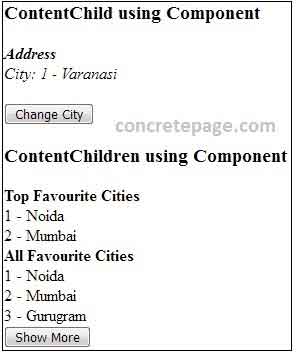
Now find the print screen of the output of @ContentChild and @ContentChildren decorators using component.
Angular 2/4 @ContentChild and @ContentChildren Example

Example 3: @ContentChild and @ContentChildren using ElementRef

Find the example of @ContentChild and @ContentChildren decorators using ElementRef. First find the component that will use @ContentChild with ElementRef
friend.component.ts

import { Component, ContentChild, ElementRef, AfterContentInit } from '@angular/core';

@Component({
  selector: 'friend',
  template: `
 Friend Name: {{friendName}}
  `
})
export class FriendComponent implements AfterContentInit {
 @ContentChild('name') nameRef: ElementRef;
 
 get friendName(): String {
    return this.nameRef.nativeElement.innerHTML;   
 }
 ngAfterContentInit() {
    console.log(this.friendName);
 }
} 
In the above component name inside @ContentChild('name') is the local template variable of a HTML element. Find the code snippet of person.component.html to use <friend> with a <div> element.

<friend>
  <div #name *ngIf="bestFriend">Mahesh</div>
  <div #name *ngIf="!bestFriend">Krishna</div>
</friend>
<br/><button (click)="onChangeFriend()">Change Friend</button> 
Find the code snippet of person.component.ts.

bestFriend = true;   
onChangeFriend() {
   this.bestFriend = (this.bestFriend === true)? false : true;
}
Now find the example for @ContentChildren with ElementRef
favourite-friends.component.ts

import { Component, ContentChildren, QueryList, ElementRef, AfterContentInit } from '@angular/core';

@Component({
  selector: 'favourite-friends',
  template: `
 <b>All Favourite Friends</b>
 <br/> {{allFriends}} 
  `
})
export class FavouriteFriendsComponent implements AfterContentInit {
        @ContentChildren('name') allFriendsRef: QueryList<ElementRef> ;
 
 get allFriends(): string {
    return this.allFriendsRef ? this.allFriendsRef.map(f =>f.nativeElement.innerHTML).join(', ') : '';
 }
 ngAfterContentInit() {
    console.log(this.allFriends);
 } 
} 
In the above component name inside @ContentChildren('name') is the local template variable of a HTML element. Find the code snippet of person.component.html to use <favourite-friends> with <div> element.

<favourite-friends>
  <div #name>Mohit</div>
  <div #name>Anup</div>
  <div #name *ngIf="showAllFriend">Nilesh</div>
  <div #name *ngIf="showAllFriend">Sravan</div>
</favourite-friends>
<br/><button (click)="onShowAllFriends()" >
  <label *ngIf="!showAllFriend">Show More</label>
  <label *ngIf="showAllFriend">Show Less</label>
</button> 
Find the code snippet of person.component.ts.

showAllFriend = false;
onShowAllFriends() {
   this.showAllFriend = (this.showAllFriend === true)? false : true;
}
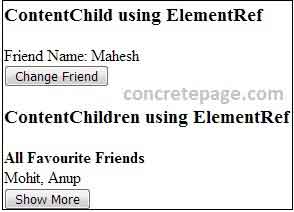
Now find the print screen of the output of @ContentChild and @ContentChildren decorators using ElementRef.
Angular 2/4 @ContentChild and @ContentChildren Example

Other Components and Application Module used in Example

person.component.ts

import { Component } from '@angular/core';

@Component({
   selector: 'person-app',
   templateUrl: './person.component.html'
})
export class PersonComponent {
   latestBook = true;
   showAllBook = false;
   homeTown = true;     
   showAllCity = false; 
   bestFriend = true;    
   showAllFriend = false;
   onChangeBook() {
    this.latestBook = (this.latestBook === true)? false : true;
   }
   onShowAllBooks() {
    this.showAllBook = (this.showAllBook === true)? false : true;
   }     
   onChangeCity() {
    this.homeTown = (this.homeTown === true)? false : true;
   }
   onShowAllCities() {
    this.showAllCity = (this.showAllCity === true)? false : true;
   }
   onChangeFriend() {
    this.bestFriend = (this.bestFriend === true)? false : true;
   }
   onShowAllFriends() {
    this.showAllFriend = (this.showAllFriend === true)? false : true;
   }
} 
person.component.html

<h3>ContentChild using Directive</h3>
<writer>
  <book bookId="1" bookName="Java 8 Tutorials" *ngIf="latestBook"></book>
  <book bookId="2" bookName="Learning Angular 4" *ngIf="!latestBook"></book>
</writer>
<br/><button (click)="onChangeBook()">Change Book</button>

<h3>ContentChildren using Directive</h3>
<favourite-books>
 <book bookId="1" bookName="Hibernate 4 Tutorials"></book>
 <book bookId="2" bookName="Spring Boot Tutorials"></book>
 <favourite-books>
    <book bookId="3" bookName="Learning JavaScript"></book>
 </favourite-books>   
 <favourite-books *ngIf="showAllBook">
    <book bookId="4" bookName="Thymeleaf Tutorials"></book>
    <book bookId="5" bookName="Android Tutorials"></book>
 </favourite-books>   
</favourite-books>
<br/><button (click)="onShowAllBooks()" >
  <label *ngIf="!showAllBook">Show More</label>
  <label *ngIf="showAllBook">Show Less</label>
</button> 

<h3>ContentChild using Component</h3>
<address>
  <city cityId="1" cityName="Varanasi" *ngIf="homeTown"></city>
  <city cityId="2" cityName="Noida" *ngIf="!homeTown"></city>
</address>
<br/><button (click)="onChangeCity()">Change City</button>

<h3>ContentChildren using Component</h3>
<favourite-cities>
 <city cityId="1" cityName="Noida"></city>
 <city cityId="2" cityName="Mumbai"></city>
 <favourite-cities>
    <city cityId="3" cityName="Gurugram"></city>
 </favourite-cities>   
 <favourite-cities *ngIf="showAllCity">
    <city cityId="4" cityName="New Delhi"></city>
    <city cityId="5" cityName="Bengaluru"></city>
 </favourite-cities>   
</favourite-cities>
<br/><button (click)="onShowAllCities()" >
  <label *ngIf="!showAllCity">Show More</label>
  <label *ngIf="showAllCity">Show Less</label>
</button> 

<h3>ContentChild using ElementRef</h3>
<friend>
  <div #name *ngIf="bestFriend">Mahesh</div>
  <div #name *ngIf="!bestFriend">Krishna</div>
</friend>
<br/><button (click)="onChangeFriend()">Change Friend</button>

<h3>ContentChildren using ElementRef</h3>
<favourite-friends>
    <div #name>Mohit</div>
    <div #name>Anup</div>
    <div #name *ngIf="showAllFriend">Nilesh</div>
    <div #name *ngIf="showAllFriend">Sravan</div>
</favourite-friends>
<br/><button (click)="onShowAllFriends()" >
  <label *ngIf="!showAllFriend">Show More</label>
  <label *ngIf="showAllFriend">Show Less</label>
</button> 
app.component.ts

import { Component } from '@angular/core';

@Component({
   selector: 'app-root',
   template: `
        <person-app></person-app>    
    `
})
export class AppComponent { 
} 
app.module.ts

import { NgModule } from '@angular/core';
import { BrowserModule } from '@angular/platform-browser';

import { AppComponent }  from './app.component';
import { BookDirective }  from './book.directive';
import { WriterComponent }  from './writer.component';
import { FavouriteBooksComponent }  from './favourite-books.component';
import { CityComponent }  from './city.component';
import { AddressComponent }  from './address.component';
import { FavouriteCitiesComponent }  from './favourite-cities.component';
import { FriendComponent }  from './friend.component';
import { FavouriteFriendsComponent }  from './favourite-friends.component';
import { PersonComponent }  from './person.component';

@NgModule({
  imports: [     
        BrowserModule
  ],
  declarations: [
        AppComponent,
 BookDirective,
 WriterComponent,
 FavouriteBooksComponent,
 CityComponent,
 AddressComponent,
 FavouriteCitiesComponent,
 FriendComponent,
 FavouriteFriendsComponent,   
 PersonComponent
  ],
  providers: [

  ],
  bootstrap: [
        AppComponent
  ]
})
export class AppModule { } 

Run Application

To run the application, find following steps. 
1. Download source code using download link given below on this page. 
2. Use downloaded src in your angular CLI application. To install angular CLI, find the link
3. Run ng serve using command prompt. 
4. Now access the URL http://localhost:4200
Bikesh Srivastava Angular, Interview Question

Life Is Complicated, But Now programmer Can Keep It Simple.