11+ Year IT Industry Experience, Working as Technical Lead with Capgemini | Consultant | Leadership and Corporate Trainer | Motivational and Technical Speaker | Career Coach | Author | MVP | Founder Of RVS Group | Trained more than 4000+ IT professionals | Azure | DevOps | ASP.NET | C# | MVC | WEB API | ANGULAR | TYPESCRIPT | MEAN | SQL | SSRS | WEB SERVICE | WCF... https://bikeshsrivastava.blogspot.in/ http://bikeshsrivastava.com/
Saturday, November 24, 2018

What is difference between Compiling and Transpiling ?

Why typescript transpiling not compiling, I think its very confusing topic for everyone so i am going to exaplin about difference between transpiling and compilation.

Despite the actual fact that the term “transpiling” has been around since last century, there seems to be a good little bit ofconfusion regarding what it suggests that and what the distinction between transpiling and compiling is.

Firstly, transpiling could be a specific quite compiling. This helps an excellent deal as we have a tendency to currently apprehend we have a tendency to square measure talking regarding identical quite issue. it's truly a selected quit compiling. thus however can we outline it compared to the a lot of general term?

Compiling
is the general term for taking source code written in one language and transforming into another
Transpiling
is a specific term for taking source code written in one language and transforming into another language that features a similar level of abstraction
So (simplistically) after you compile C#, your methodology bodies square measure reworked by the compiler into IL. This can't be referred to as transpiling as a result of the 2 languages square measure terribly totally different levels of abstraction.


When you compile matter, it's transformed by the compiler into JavaScript. These square measure terribly similar levels of abstraction, thus you may decision this transpiling.

Both compilers and transpilers will optimise the code as a part of the method.

Other common combos that may be dubbed as transpiling embody C++ to C, CoffeeScript to JavaScript, Dart to JavaScript and PHP to C++
Bikesh Srivastava Angular
Friday, May 25, 2018

Node.js Syllabus for deep learning.

Node.js Syllabus By Bikesh Srivastava


Lession 0: Prerequisites
  • Basic JavaScript skills.
  • Web Development background
Lession 1: Node.js (https://nodejs.org/en/) and NPM.
Lession 2:Asynchronous JavaScript Everywhere
  • Introduction - What is Node.js.
  • The importance of being asynchronous
  • Node.js Event loop
  • The Node.js process
Lession 3:File System
  • The FS Module.
  • Reading Directories
  • Reading Files
  • Streams
Lession 4:Building servers
  • Creating servers with HTTP
  • Receiving data
  • HTTP streaming
  • Working with TCP
Lession 5:Building APIs using modules, events and packages
  • CommonJS Modules
  • npm Packages
  • The EventEmitter API
Lession 6:ExpressJS
  • Introduction to ExpressJS
  • Routing
  • Configuration
  • Views
  • Middlewares
  • Working With Data
  • Working With Socket.io
Lession 7: Processes & Clusters
  • Child Process Module
  • Why clusters
  • The cluster object
  • The worker object
Lession 8:Best Practices
  • NPM
  • Best Practices
  • Node.js API design
  • Error Handling
  • Debugging
Lession 9:Hosting Node
  • Why do we need hosts
  • Forever
  • PM2
  • Node on Windows
  • Node as a Windows Service
  • IISNode
  • Unit Testing
Bikesh Srivastava Syllabus

Blockchain Syllabus for deep learning.

Blockchain Syllabus By Bikesh Srivastava


Lesson 0: Blockchain

  • What is Blockchain
  • Blockchain Technology Mechanisms & Networks
  • Blockchain Origins
  • Blockchain Objectives
  • Blockchain Users And Adoption
  • Blockchain Challenges
  • Transactions And Blocks
  • P2P Systems
  • Keys As Identity
  • Digital Signatures
  • Hashes As Addresses
  • Hash Pointers And Data Structures
  • Blockchain Transactions
  • Blockchain Block Structure
  • Mining Explained

Lesson 1: Bitcoin

  • What is Bitcoin
  • The Bitcoin Network
  • The Bitcoin Mining Process
  • Mining Developments
  • Bitcoin Wallets
  • Decentralization And Hard Forks
  • Alternative Blockchains/Altchains
  • Ethereum Consensus Mechanisms
  • How Smart Contracts Work
  • Difference Between Private Consortium And Public Networks
  • Ethereum Virtual Machine (EVM)
  • Merkle Tree
  • Double-Spend Problem
  • New Developments In Blockchain
  • Ethereum’s Ecosystem And Dapps
  • Blockchain And Digital Currency
  • Transactional Blocks
  • Impact Of Blockchain Technology On Cryptocurrency
  • Cryptography

Lesson 2: Ethereum

  • What is Ethereum?
  • Introduction
  • A Short History Lesson
  • Interfacing with Ethereum Networks
  • Metamask Setup
  • Ethereum Accounts
  • Receiving Ether
  • What's a Transaction?
  • Smart Contracts
  • Our First Contract
  • Contract Structure
  • Function Declarations
  • Testing with Remix
  • Redeploying Contracts
  • Behind the Scenes of Deployment
  • More on Running Functions Than You Want to Know
  • Wei vs Ether
  • Gas and Transactions
  • Mnemonic Phrases
  • Getting More Ether

Lesson 3: Solidity Programming for Ethereum

  • Solidity - Language of Smart Contracts
  • Installing Solidity & Ethereum Wallet
  • Basics of Solidity by Example: Subcoin Smart Contract
  • Layout of a Solidity Source File & Structure of Smart Contracts
  • General Value Types (Int, Real, String, Bytes, Arrays, Mapping, Enum, address)
  • Ether Units, Time Units

Lesson 4: Ethereum coding for Blockchain environment

  • Globally Available Variables & Functions
  • Operators: Arithmetic, Logical & Bitwise Operators
  • Control Structure (if-else, for, while, Do-While)
  • Scoping and Declarations
  • Input Parameters and Output Parameters
  • Function Calls & Return Types
  • Function Modifiers
  • Fallback Function
  • Abstract Contract
  • Creating Contracts via "new" Operator
  • Inheriting Smart Contracts
  • Importing Smart Contracts & Compiling Contracts
  • Events & Logging
  • Exceptions
  • Don't Skip! Node JS Versioning

Lesson 5: Contract Deployment for Blockchain Environment

  • Boilerplate Requirements
  • Project File Walkthrough
  • Syntax Highlighters
  • Compiling Solidity
  • The Compile Script
  • Testing Architecture
  • Running Windows?
  • Installing Modules
  • Web3 Versioning
  • Web3 Providers
  • Testing with Mocha
  • Mocha Structure
  • Fetching Accounts from Ganache
  • Refactor to Async/Await
  • Deployment with Web3
  • Deployed Inbox Overview
  • Asserting Deployment
  • Web3 Version Fix
  • Verifying the Initial Message
  • Testing Message Updates
  • Deployment with Infura
  • Infura Signup
  • Wallet Provider Setup
  • Deployment to Rinkeby
  • Observing Deployment on Etherscan
  • Deployed Contracts in Remix
  • Complete Example: Crowd Funding Smart Contract
  • Complete Example: Voting Ballot Smart Contract

Lesson 6: Advanced Smart Contracts

  • The Lottery Contract
  • Lottery Design
  • Basic Solidity Types
  • Starting the Lottery Contract
  • The Message Global Variable
  • Overview of Arrays
  • Overview of Mappings and Structs
  • Big Solidity Gotcha
  • Entering the Lottery
  • Validation with Require Statements
  • The Remix Debugger
  • Pseudo Random Number Generator
  • Selecting a Winner
  • Sending Ether from Contracts
  • Resetting Contract State
  • Requiring Managers
  • Function Modifiers
  • Returning Players Array
  • Contract Review

Lesson 7: Ethereum Test Environment Setup

  • Test Project Updates
  • Test Helper Review
  • Asserting Deployment
  • Entering the Lottery
  • Asserting Multiple Players
  • Try-Catch Assertions
  • Testing Function Modifiers
  • End to End Test
  • Building Interactive Front-Ends

Lesson 8: Ethereum Application Architecture

  • Application Overview
  • Getting Started with Create-React-App
  • Multiple Web3 Instances
  • Web3 Setup
  • Deploying the Lottery Contract
  • Local Contract Instances
  • Rendering Contract Data
  • Instance Properties
  • Accessing More Properties
  • The 'Enter' Form
  • Form Setup
  • Entering the Lottery
  • Picking a Winner
  • Project Review

Lesson 9: Real World Ethereum Projects

  • Solving Real Problems with Contracts
  • Fixing Kickstarter's Issues
  • Campaign Contract Design
  • Campaign Constructor
  • Contributing to the Campaign
  • A Quick Test
  • The Request Struct
  • More on Function Modifiers
  • Creating Struct Instances
  • Instance Creation Syntax
  • Storage and Memory
  • More on Storage vs Memory
  • Voting System Requirements
  • The Wrong Voting System
  • Issues with Arrays
  • Mappings vs Arrays
  • Basics of Mappings
  • Refactoring to Mappings
  • Refactoring Request Stucts
  • More on Struct Initialization
  • Approving a Request
  • Testing Request Approvals
  • Finalizing a Request
  • Last Remix Test
  • Thinking about Deployment
  • Solution to Deployment
  • Adding a Campaign Factory
  • Testing the Factory

Lesson 10: Creating Project Infrastructure for Ethereum

  • Project Setup
  • Directory Structure
  • A Better Compile Script
  • Single Run Compilation
  • More on Compile
  • Test File Setup
  • Creating Campaign Instances
  • Testing Warmup
  • Accessing Mappings
  • Requiring Minimum Contributions
  • Array Getters
  • One End to End Test
  • Deployment
  • Refactoring Deployment
  • Advanced Multi-Page Front-Ends
  • App Mockups
  • CRA vs Next
  • Next's Pages Architecture
  • Basics of Next Routing
  • Root Routes
  • CampaignFactory Instance
  • Getting a Test Campaign
  • Fetching Deployed Campaigns
  • Why Next.js?
  • Server vs Client Web3 Instances
  • GetInitialProps Function
  • Semantic UI React
  • Card Group Setup
  • Rendering Card Groups
  • Adding CSS
  • Adding a Button
  • The Need for a Layout
  • The Layout Component
  • Assembling a Header
  • Constraining Content Width
  • Two Column Layout
  • Nested Routing
  • Final CSS Fix
  • Form Creation
  • Input Change Handlers
  • Form Submittal
  • Testing Submittal
  • Form Error Handling
  • Button Spinners
  • Routing Issues
  • Next Routes Setup
  • Automatic Navigation
  • Header Navigation
  • Routing to Campaigns
  • Restarting the Server
  • Route Mappings

Lesson 11: Ethereum Campaigns

  • Planning CampaignShow
  • Redeploying CampaignFactory
  • CampaignShow's GetInitialProps
  • Accessing a Campaign
  • Summary Translation Layer
  • Custom Card Groups
  • One Card Per Property
  • The Contribute Form
  • Grid Layouts
  • Form State
  • Communicating the Campaign Address
  • Making a Contribution
  • Refreshing Contract Data
  • Spinners and Error Handlers
  • Listing Requests
  • Grids vs Columns
  • More Routing!
  • Request Creation Form
  • Creating a Request
  • Form Polish
  • Creating a Request
  • Requests One by One
  • Fancy Javascript
  • Small Typo!
  • Rendering a Table
  • Request Row Component
  • Request Row Content
  • Approvers Count Cell
  • Approving a Request
  • Finalizing Requests
  • Testing Finalization
  • Row Status Styling
  • Finishing Requests Index

Lesson 12: Introduction to Hyperledger

  • What is Hyperledger?
  • Distributed Ledger Technology & its Challenges
  • Hyperledger & Distributed Ledger Technology

Lesson 13: Introduction to Hyperledger Fabric using Composer

  • Hyperledger Fabric & Composer Concepts
  • Hyperledger Fabric : A DLT for Business Applications
  • Hyperledger Fabric : DLT for Business
  • Assets, Chaincode & Ledger
  • Assets, Chaincode and Transactions
  • Permissioned Network, Members & Membership Service Provider
  • Permissioned Network, Member & Membership Services
  • Nodes and Channels
  • Hyperledger Fabric Composer Overview
  • Pre-Requisites for Fabric development
  • Frequently Asked Questions | Common Issues
  • Development Machine Specifications & IDE
  • Composer Dev Tools Installation
  • Exercise: Validate the Composer Development Environment
  • Install Docker or Docker Toolkit
  • Install CURL and Cygwin (Windows only)

Lesson 14: Setting up the Hyperledger Fabric Developer Environment Tools

  • Linux/Ubuntu & AWS: Setup of Fabric Development on Local & Cloud VM
  • Mac OS: Setup of Fabric Development Environment
  • Windows : Fabric development environment setup
  • How to use the Dev Tools
  • Development Environment Topology
  • Fabric Under the Hood (Concepts & Terminology)
  • Ledger Implementation
  • Dev Environment Walkthrough: Peer & CouchDB setup
  • Ledger Implementation
  • Peers Nodes : Anchors and Endorsers
  • Anchor Peers & Endorsing Peers
  • Clients Node: Endorsement Policies
  • Client Peer & Endorsing Policies
  • Orderer Nodes
  • Membership Service Provider & Certification Authority
  • Dev Environment Walkthrough: Orderer and CA Server
  • Chaincode Development

Lesson 15: Hyperledger Composer tools for application development

  • Linux/Ubuntu & AWS: Setup of Fabric Development on Local & Cloud VM
  • Mac OS: Setup of Fabric Development Environment
  • Windows : Fabric development environment setup
  • How to use the Dev Tools
  • Development Environment Topology
  • Fabric Under the Hood (Concepts & Terminology)
  • Ledger Implementation
  • Dev Environment Walkthrough: Peer & CouchDB setup
  • Ledger Implementation
  • Peers Nodes : Anchors and Endorsers
  • Anchor Peers & Endorsing Peers
  • Clients Node: Endorsement Policies
  • Client Peer & Endorsing Policies
  • Orderer Nodes
  • Membership Service Provider & Certification Authority
  • Dev Environment Walkthrough: Orderer and CA Server
  • Chaincode Development

Lesson 16: Front end application development using Hyperledger composer

  • Developing Front End Applications for Network Applications
  • Application Design Patterns
  • Application Architecture Patterns
  • Securing the REST server with Authentication Strategy
  • Walkthrough: Applying OAuth2.0 Authentication Strategy to REST Server
  • Working of Multi User Enabled REST Server
  • Walkthrough - REST Server Multi User mode
  • Create the Design Blueprint for the Fabric Application UI


Bikesh Srivastava Syllabus

Python Syllabus for deep learning.

Python Syllabus By Bikesh Srivastava


1: Introduction To Python

  • Installation and Working with Python
  • Understanding Python variables
  • Python basic Operators
  • Understanding python blocks

 2: Python Data Types

  • Declaring and using Numeric data types: int, float, complex
  • Using string data type and string operations
  • Defining list and list slicing
  • Use of Tuple data type

 3: Python Program Flow Control

  • Conditional blocks using if, else and else if
  • Simple for loops in python
  • For loop using ranges, string, list and dictionaries
  • Use of while loops in python
  • Loop manipulation using pass, continue, break and else
  • Programming using Python conditional and loops block 

4: Python Functions, Modules And Packages

  • Organizing python codes using functions
  • Organizing python projects into modules
  • Importing own module as well as external modules
  • Understanding Packages
  • Powerful Lamda function in python
  • Programming using functions, modules and external packages

5: Python String, List And Dictionary Manipulations

  • Building blocks of python programs
  • Understanding string in build methods
  • List manipulation using in build methods
  • Dictionary manipulation
  • Programming using string, list and dictionary in build functions

6: Python File Operation

  • Reading config files in python
  • Writing log files in python
  • Understanding read functions, read(), readline() and readlines()
  • Understanding write functions, write() and writelines()
  • Manipulating file pointer using seek
  • Programming using file operations

7: Python Object Oriented Programming – Oops

  • Concept of class, object and instances
  • Constructor, class attributes and destructors
  • Real time use of class in live projects
  • Inheritance , overlapping and overloading operators
  • Adding and retrieving dynamic attributes of classes
  • Programming using Oops support

8: Python Regular Express ion

  • Powerful pattern matching and searching
  • Power of pattern searching using regex in python
  • Real time parsing of networking or system data using regex
  • Password, email, url validation using regular expression
  • Pattern finding programs using regular expression

9: Python Exception Handling

  • Avoiding code break using exception handling
  • Safe guarding file operation using exception handling
  • Handling and helping developer with error code
  • Programming using Exception handling

10: Python Database Interaction

  • SQL Database connection using python
  • Creating and searching tables
  • Reading and storing config information on database
  • Programming using database connections

11: Python Multithreading

  • Understanding threads
  • Forking threads
  • Synchronizing the threads
  • Programming using multi threading

12: Contacting User Through Emails Using Python

  • Installing smtp python module
  • Sending email
  • Reading from file and sending emails to all users addressing them
  • directly for marketing

13: Python CGI Introduction

  • Writing python program for CGI applications
  • Creating menus and accessing files
  • Server client program 

14: Demo Project.
Bikesh Srivastava Syllabus
Saturday, January 27, 2018

Best Practices of HTML with CSS.

1: Always Close Your Tags

Back in the day, it wasn't uncommon to see things like this:

Bad:

1
2
3
<li>Some text here.
<li>Some new text here.
<li>You get the idea.
Notice how the wrapping UL/OL tag was omitted. Additionally, many chose to leave off the closing LI tags as well. By today's standards, this is simply bad practice and should be 100% avoided. Always, always close your tags. Otherwise, you'll encounter validation and glitch issues at every turn.

Better:

1
2
3
4
5
<ul>
<li>Some text here. </li>
<li>Some new text here. </li>
<li>You get the idea. </li>
</ul>

2: Declare the Correct DocType

When I was younger, I participated quite a bit in CSS forums. Whenever a user had an issue, before we would look at their situation, they HAD to perform two things first:
  1. Validate the CSS file. Fix any necessary errors.
  2. Add a doctype.
"The DOCTYPE goes before the opening html tag at the top of the page and tells the browser whether the page contains HTML, XHTML, or a mix of both, so that it can correctly interpret the markup."
Most of us choose between four different doctypes when creating new websites.
There's a big debate currently going on about the correct choice here. At one point, it was considered to be best practice to use the XHTML Strict version. However, after some research, it was realized that most browsers revert back to regular HTML when inter pretting it. For that reason, many have chosen to use HTML 4.01 Strict instead. The bottom line is that any of these will keep you in check. Do some research and make up your own mind.

3: Never Use Inline Styles

When you're hard at work on your markup, sometimes it can be tempting to take the easy route and sneak in a bit of styling.

Bad:

1
<p style="color: red;">I'm going to make this text red so that it really stands out and makes people take notice! </p>
Sure -- it looks harmless enough. However, this points to an error in your coding practices.

Better

1
2
3
#someElement > p {
color: red;
}

4: Place all External CSS Files Within the Head Tag

Technically, you can place stylesheets anywhere you like. However, the HTML specification recommends that they be placed within the document HEAD tag. The primary benefit is that your pages will seemingly load faster.
1
2
3
4
5
<head>
<title>My Favorites Kinds of Corn</title>
<link rel="stylesheet" type="text/css" media="screen" href="path/to/file.css" />
<link rel="stylesheet" type="text/css" media="screen" href="path/to/anotherFile.css" />
</head>

5: Consider Placing Javascript Files at the Bottom

Remember -- the primary goal is to make the page load as quickly as possible for the user. When loading a script, the browser can't continue on until the entire file has been loaded. Thus, the user will have to wait longer before noticing any progress.
If you have JS files whose only purpose is to add functionality -- for example, after a button is clicked -- go ahead and place those files at the bottom, just before the closing body tag. This is absolutely a best practice.

Better:

1
2
3
4
5
<p>And now you know my favorite kinds of corn. </p>
<script type="text/javascript" src="path/to/file.js"></script>
<script type="text/javascript" src="path/to/anotherFile.js"></script>
</body>
</html>

6: Never Use Inline Javascript.

Another common practice years ago was to place JS commands directly within tags. This was very common with simple image galleries. Essentially, a "onclick" attribute was appended to the tag. The value would then be equal to some JS procedure. Needless to say, you should never, ever do this. Instead, transfer this code to an external JS file and use "addEventListener/attachEvent" to "listen" for your desired event. Or, if using a framework like jQuery, just use the "click" method.
$('a#moreCornInfoLink').click(function() {
alert('Want to learn more about corn?');
});
7: Download Firebug
I can't recommend this one enough. Firebug is, without doubt, the best plugin you'll ever use when creating websites. Not only does it provide incredible Javascript debugging, but you'll also learn how to pinpoint which elements are inheriting that extra padding that you were unaware of. Download it!

8: Use Firebug!

From my experiences, many users only take advantage of about 20% of Firebug's capabilities. You're truly doing yourself a disservice. Take a couple hours and scour the web for every worthy tutorial you can find on the subject.

Resources

9: Keep Your Tag Names Lowercase

Technically, you can get away with capitalizing your tag names.
1
2
3
<DIV>
<P>Here's an interesting fact about corn. </P>
</DIV>
Having said that, please don't. It serves no purpose and hurts my eyes -- not to mention the fact that it reminds me of Microsoft Word's html function!

Better

1
2
3
<div>
<p>Here's an interesting fact about corn. </p>
</div>


10. Keep image file sizes small:

You have only a few seconds to grab the recipients attention – don’t waste it with large images that take too long to load.


Bikesh Srivastava

What is @ContentChild and @ContentChildren in Angular5 with Example

This page will walk through Angular @ContentChild and @ContentChildren decorator example. They are used to fetch first or all elements from content DOM. @ContentChild gives first element matching the selector from the content DOM. @ContentChildren gives all elements of content DOM as QueryList. Contents queried by @ContentChild and @ContentChildren are set before ngAfterContentInit() is called. If we do any change in content DOM for the matching selector, that will be observed by @ContentChild and @ContentChildren and we will get updated value. As a selector for @ContentChild and @ContentChildren, we can pass directive, component or local template variable. By default @ContentChildren only selects direct children of content DOM and not all descendants. @ContentChildren has a metadata descendants and setting its value true, we can fetch all descendant elements. Here on this page we will provide @ContentChild and @ContentChildren example using directive, component and ElementRef . Now find the complete example step by step.

Technologies Used

Find the technologies being used in our example. 
1. Angular 4.2.4 
2. TypeScript 2.3.3 
3. Node.js 6.10.1 
4. Angular CLI 1.3.1 
5. Angular Compiler CLI 4.2.4

Project Structure

Find the project structure of our demo application.

angular-demo
|
|--src
|   |
|   |--app 
|   |   |
|   |   |--app.module.ts
|   |   |--app.component.ts
|   |   |--book.directive.ts
|   |   |--writer.component.ts
|   |   |--favourite-books.component.ts
|   |   |--city.component.ts
|   |   |--address.component.ts
|   |   |--favourite-cities.component.ts
|   |   |--friend.component.ts
|   |   |--favourite-friends.component.ts
|   |   |--person.component.ts
|   |   |--person.component.html
|   |   
|   |--main.ts
|   |--index.html
|   |--styles.css
|
|--node_modules
|--package.json

@ContentChild and @ContentChildren

@ContentChild and @ContentChildren both are decorators. They are used to fetch single child element or all child elements from content DOM. Let us understand more about it. 

@ContentChild

@ContentChild gives the first element or directive matching the selector from the content DOM. If new child element replaces the old one matching the selector in content DOM, then property will also be updated. @ContentChild has following metadata properties. 
selector: Directive type or the name used for querying. Find the example when type is directive.

@ContentChild(BookDirective) book: BookDirective; 
read: This is optional metadata. It reads a different token from the queried element. 

@ContentChildren

@ContentChildren is used to get QueryList of elements or directives from the content DOM. When there is change in content DOM, data in QueryList will also change. If child elements are added, we will get those new elements in QueryList. If child elements are removed, then those elements will be removed from the QueryList. The metadata properties of @ContentChildren are as follows. 
selector: Directive type or the name used for querying. Find the example when type is directive.

@ContentChildren(BookDirective) topBooks: QueryList<BookDirective>
descendants: This is Boolean value. When it is true then direct children and other descendants will also be included. If the value is false then only direct children will be included. descendants is used as follows.

@ContentChildren(BookDirective, {descendants: true}) allBooks: QueryList<BookDirective>
The default value of descendants is false
read: This is optional metadata. It reads a different token from the queried element.

Using AfterContentInit

AfterContentInit is a lifecycle hook that is called after directive content is fully initialized. It has a method ngAfterContentInit(). This method runs after angular loads external content into the component view. This method runs once after first ngDoCheck() method. Contents queried by @ContentChild and @ContentChildren are set before ngAfterContentInit() is called. AfterContentInit is used as given below.

@Component({
  selector: 'friend',
  template: ``
})
export class FriendComponent implements AfterContentInit {
 @ContentChild('name') nameRef: ElementRef;
 ngAfterContentInit() {
    console.log(this.nameRef.nativeElement.innerHTML);
 }
}

Example 1: @ContentChild and @ContentChildren using Directive

Find the example of @ContentChild and @ContentChildren decorators using directive. First we will create a directive with selector as element name. 
book.directive.ts

import { Directive, Input } from '@angular/core';

@Directive({
    selector: 'book'
})
export class BookDirective {
    @Input() bookId: string;
    @Input() bookName: string;
} 
In the above directive we have used two @Input() properties. <book> element can be used in any component. Now create a component to use @ContentChild decorator to query element of type <book>
writer.component.ts

import { Component, ContentChild } from '@angular/core';
import { BookDirective } from './book.directive';

@Component({
  selector: 'writer',
  template: `
        Name: {{writerName}}
 <br/>Latest Book: {{book?.bookId}} - {{book?.bookName}} 
  `
})
export class WriterComponent {
 @ContentChild(BookDirective) book: BookDirective;
 writerName = 'Mahesh';
} 
Find the code snippet of person.component.html to use <writer> and <book> elements.

<writer>
  <book bookId="1" bookName="Java 8 Tutorials" *ngIf="latestBook"></book>
  <book bookId="2" bookName="Learning Angular 4" *ngIf="!latestBook"></book>
</writer>
<br/><button (click)="onChangeBook()">Change Book</button> 
Find the code snippet of person.component.ts.

latestBook = true;
onChangeBook() {
   this.latestBook = (this.latestBook === true)? false : true;
}
Now we will create the example of @ContentChildren using directive. 
favourite-books.component.ts

import { Component, ContentChildren, QueryList } from '@angular/core';
import { BookDirective } from './book.directive';

@Component({
  selector: 'favourite-books',
  template: `
        <b>Top Favourite Books</b>
 <ng-template ngFor let-book [ngForOf]= "topBooks">
    <br/>{{book.bookId}} - {{book.bookName}}
 </ng-template>
  
 <br/><b>All Favorite Books</b>
 <ng-template ngFor let-book [ngForOf]= "allBooks">
    <br/>{{book.bookId}} - {{book.bookName}}
 </ng-template> 
  `
})
export class FavouriteBooksComponent {
    @ContentChildren(BookDirective) topBooks: QueryList<BookDirective>
    @ContentChildren(BookDirective, {descendants: true}) allBooks: QueryList<BookDirective>
} 
In the above component we are using @ContentChildren two times, one with default descendants and second with descendants with true value. Find the code snippet of person.component.html to use <favourite-books> and <book>elements.

<favourite-books>
  <book bookId="1" bookName="Hibernate 4 Tutorials"></book>
  <book bookId="2" bookName="Spring Boot Tutorials"></book>
  <favourite-books>
    <book bookId="3" bookName="Learning JavaScript"></book>
  </favourite-books>   
  <favourite-books *ngIf="showAllBook">
    <book bookId="4" bookName="Thymeleaf Tutorials"></book>
    <book bookId="5" bookName="Android Tutorials"></book>
  </favourite-books>   
</favourite-books>
<br/><button (click)="onShowAllBooks()" >
  <label *ngIf="!showAllBook">Show More</label>
  <label *ngIf="showAllBook">Show Less</label>
</button> 
Find the code snippet of person.component.ts.

showAllBook = false;
onShowAllBooks() {
   this.showAllBook = (this.showAllBook === true)? false : true;
} 
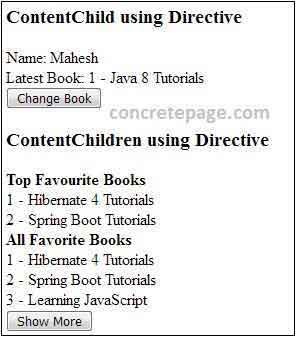
Now find the print screen of the output of @ContentChild and @ContentChildren decorators using directive.
Angular 2/4 @ContentChild and @ContentChildren Example

Example 2: @ContentChild and @ContentChildren using Component

Find the example of @ContentChild and @ContentChildren decorators using component. Here for child element we will create a component instead of directive. 
city.component.ts

import { Component, Input } from '@angular/core';

@Component({
  selector: 'city',
  template: ``
})
export class CityComponent {
    @Input() cityId: string; 
    @Input() cityName: string;
} 
In the above component, we have used two @Input() properties. Now find the component that will use @ContentChild
address.component.ts

import { Component, ContentChild } from '@angular/core';
import { CityComponent } from './city.component';

@Component({
  selector: 'address',
  template: `
        <b>{{title}}</b>
 <br/>City: {{city?.cityId}} - {{city?.cityName}} 
  `
})
export class AddressComponent {
 @ContentChild(CityComponent) city: CityComponent;
 title = 'Address';
} 
Find the code snippet of person.component.html to use <address> and <city> element.

<address>
  <city cityId="1" cityName="Varanasi" *ngIf="homeTown"></city>
  <city cityId="2" cityName="Noida" *ngIf="!homeTown"></city>
</address>
<br/><button (click)="onChangeCity()">Change City</button> 
Find the code snippet of person.component.ts.

homeTown = true;
onChangeCity() {
   this.homeTown = (this.homeTown === true)? false : true;
}
Now find the example for @ContentChildren using component. 
favourite-cities.component.ts

import { Component, ContentChildren, QueryList } from '@angular/core';
import { CityComponent } from './city.component';

@Component({
  selector: 'favourite-cities',
  template: `
        <b>Top Favourite  Cities</b>
 <ng-template ngFor let-city [ngForOf]= "topCities">
    <br/>{{city.cityId}} - {{city.cityName}}
 </ng-template>
  
 <br/><b>All Favourite Cities</b>
 <ng-template ngFor let-city [ngForOf]= "allCities">
    <br/>{{city.cityId}} - {{city.cityName}}
 </ng-template> 
  `
})
export class FavouriteCitiesComponent {
    @ContentChildren(CityComponent) topCities: QueryList<CityComponent>
    @ContentChildren(CityComponent, {descendants: true}) allCities: QueryList<CityComponent>
} 
Find the code snippet of person.component.html to use <favourite-cities> and <city> element.

<favourite-cities>
  <city cityId="1" cityName="Noida"></city>
  <city cityId="2" cityName="Mumbai"></city>
  <favourite-cities>
    <city cityId="3" cityName="Gurugram"></city>
  </favourite-cities>   
  <favourite-cities *ngIf="showAllCity">
    <city cityId="4" cityName="New Delhi"></city>
    <city cityId="5" cityName="Bengaluru"></city>
  </favourite-cities>   
</favourite-cities>
<br/><button (click)="onShowAllCities()" >
  <label *ngIf="!showAllCity">Show More</label>
  <label *ngIf="showAllCity">Show Less</label>
</button> 
Find the code snippet of person.component.ts.

showAllCity = false; 
onShowAllCities() {
   this.showAllCity = (this.showAllCity === true)? false : true;
}
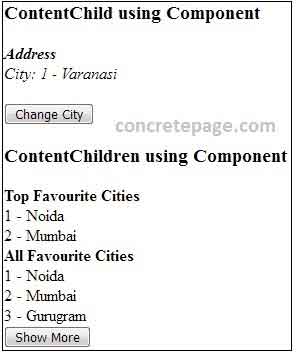
Now find the print screen of the output of @ContentChild and @ContentChildren decorators using component.
Angular 2/4 @ContentChild and @ContentChildren Example

Example 3: @ContentChild and @ContentChildren using ElementRef

Find the example of @ContentChild and @ContentChildren decorators using ElementRef. First find the component that will use @ContentChild with ElementRef
friend.component.ts

import { Component, ContentChild, ElementRef, AfterContentInit } from '@angular/core';

@Component({
  selector: 'friend',
  template: `
 Friend Name: {{friendName}}
  `
})
export class FriendComponent implements AfterContentInit {
 @ContentChild('name') nameRef: ElementRef;
 
 get friendName(): String {
    return this.nameRef.nativeElement.innerHTML;   
 }
 ngAfterContentInit() {
    console.log(this.friendName);
 }
} 
In the above component name inside @ContentChild('name') is the local template variable of a HTML element. Find the code snippet of person.component.html to use <friend> with a <div> element.

<friend>
  <div #name *ngIf="bestFriend">Mahesh</div>
  <div #name *ngIf="!bestFriend">Krishna</div>
</friend>
<br/><button (click)="onChangeFriend()">Change Friend</button> 
Find the code snippet of person.component.ts.

bestFriend = true;   
onChangeFriend() {
   this.bestFriend = (this.bestFriend === true)? false : true;
}
Now find the example for @ContentChildren with ElementRef
favourite-friends.component.ts

import { Component, ContentChildren, QueryList, ElementRef, AfterContentInit } from '@angular/core';

@Component({
  selector: 'favourite-friends',
  template: `
 <b>All Favourite Friends</b>
 <br/> {{allFriends}} 
  `
})
export class FavouriteFriendsComponent implements AfterContentInit {
        @ContentChildren('name') allFriendsRef: QueryList<ElementRef> ;
 
 get allFriends(): string {
    return this.allFriendsRef ? this.allFriendsRef.map(f =>f.nativeElement.innerHTML).join(', ') : '';
 }
 ngAfterContentInit() {
    console.log(this.allFriends);
 } 
} 
In the above component name inside @ContentChildren('name') is the local template variable of a HTML element. Find the code snippet of person.component.html to use <favourite-friends> with <div> element.

<favourite-friends>
  <div #name>Mohit</div>
  <div #name>Anup</div>
  <div #name *ngIf="showAllFriend">Nilesh</div>
  <div #name *ngIf="showAllFriend">Sravan</div>
</favourite-friends>
<br/><button (click)="onShowAllFriends()" >
  <label *ngIf="!showAllFriend">Show More</label>
  <label *ngIf="showAllFriend">Show Less</label>
</button> 
Find the code snippet of person.component.ts.

showAllFriend = false;
onShowAllFriends() {
   this.showAllFriend = (this.showAllFriend === true)? false : true;
}
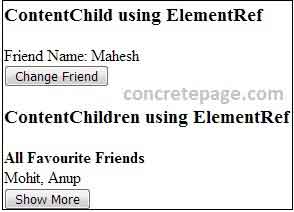
Now find the print screen of the output of @ContentChild and @ContentChildren decorators using ElementRef.
Angular 2/4 @ContentChild and @ContentChildren Example

Other Components and Application Module used in Example

person.component.ts

import { Component } from '@angular/core';

@Component({
   selector: 'person-app',
   templateUrl: './person.component.html'
})
export class PersonComponent {
   latestBook = true;
   showAllBook = false;
   homeTown = true;     
   showAllCity = false; 
   bestFriend = true;    
   showAllFriend = false;
   onChangeBook() {
    this.latestBook = (this.latestBook === true)? false : true;
   }
   onShowAllBooks() {
    this.showAllBook = (this.showAllBook === true)? false : true;
   }     
   onChangeCity() {
    this.homeTown = (this.homeTown === true)? false : true;
   }
   onShowAllCities() {
    this.showAllCity = (this.showAllCity === true)? false : true;
   }
   onChangeFriend() {
    this.bestFriend = (this.bestFriend === true)? false : true;
   }
   onShowAllFriends() {
    this.showAllFriend = (this.showAllFriend === true)? false : true;
   }
} 
person.component.html

<h3>ContentChild using Directive</h3>
<writer>
  <book bookId="1" bookName="Java 8 Tutorials" *ngIf="latestBook"></book>
  <book bookId="2" bookName="Learning Angular 4" *ngIf="!latestBook"></book>
</writer>
<br/><button (click)="onChangeBook()">Change Book</button>

<h3>ContentChildren using Directive</h3>
<favourite-books>
 <book bookId="1" bookName="Hibernate 4 Tutorials"></book>
 <book bookId="2" bookName="Spring Boot Tutorials"></book>
 <favourite-books>
    <book bookId="3" bookName="Learning JavaScript"></book>
 </favourite-books>   
 <favourite-books *ngIf="showAllBook">
    <book bookId="4" bookName="Thymeleaf Tutorials"></book>
    <book bookId="5" bookName="Android Tutorials"></book>
 </favourite-books>   
</favourite-books>
<br/><button (click)="onShowAllBooks()" >
  <label *ngIf="!showAllBook">Show More</label>
  <label *ngIf="showAllBook">Show Less</label>
</button> 

<h3>ContentChild using Component</h3>
<address>
  <city cityId="1" cityName="Varanasi" *ngIf="homeTown"></city>
  <city cityId="2" cityName="Noida" *ngIf="!homeTown"></city>
</address>
<br/><button (click)="onChangeCity()">Change City</button>

<h3>ContentChildren using Component</h3>
<favourite-cities>
 <city cityId="1" cityName="Noida"></city>
 <city cityId="2" cityName="Mumbai"></city>
 <favourite-cities>
    <city cityId="3" cityName="Gurugram"></city>
 </favourite-cities>   
 <favourite-cities *ngIf="showAllCity">
    <city cityId="4" cityName="New Delhi"></city>
    <city cityId="5" cityName="Bengaluru"></city>
 </favourite-cities>   
</favourite-cities>
<br/><button (click)="onShowAllCities()" >
  <label *ngIf="!showAllCity">Show More</label>
  <label *ngIf="showAllCity">Show Less</label>
</button> 

<h3>ContentChild using ElementRef</h3>
<friend>
  <div #name *ngIf="bestFriend">Mahesh</div>
  <div #name *ngIf="!bestFriend">Krishna</div>
</friend>
<br/><button (click)="onChangeFriend()">Change Friend</button>

<h3>ContentChildren using ElementRef</h3>
<favourite-friends>
    <div #name>Mohit</div>
    <div #name>Anup</div>
    <div #name *ngIf="showAllFriend">Nilesh</div>
    <div #name *ngIf="showAllFriend">Sravan</div>
</favourite-friends>
<br/><button (click)="onShowAllFriends()" >
  <label *ngIf="!showAllFriend">Show More</label>
  <label *ngIf="showAllFriend">Show Less</label>
</button> 
app.component.ts

import { Component } from '@angular/core';

@Component({
   selector: 'app-root',
   template: `
        <person-app></person-app>    
    `
})
export class AppComponent { 
} 
app.module.ts

import { NgModule } from '@angular/core';
import { BrowserModule } from '@angular/platform-browser';

import { AppComponent }  from './app.component';
import { BookDirective }  from './book.directive';
import { WriterComponent }  from './writer.component';
import { FavouriteBooksComponent }  from './favourite-books.component';
import { CityComponent }  from './city.component';
import { AddressComponent }  from './address.component';
import { FavouriteCitiesComponent }  from './favourite-cities.component';
import { FriendComponent }  from './friend.component';
import { FavouriteFriendsComponent }  from './favourite-friends.component';
import { PersonComponent }  from './person.component';

@NgModule({
  imports: [     
        BrowserModule
  ],
  declarations: [
        AppComponent,
 BookDirective,
 WriterComponent,
 FavouriteBooksComponent,
 CityComponent,
 AddressComponent,
 FavouriteCitiesComponent,
 FriendComponent,
 FavouriteFriendsComponent,   
 PersonComponent
  ],
  providers: [

  ],
  bootstrap: [
        AppComponent
  ]
})
export class AppModule { } 

Run Application

To run the application, find following steps. 
1. Download source code using download link given below on this page. 
2. Use downloaded src in your angular CLI application. To install angular CLI, find the link
3. Run ng serve using command prompt. 
4. Now access the URL http://localhost:4200
Bikesh Srivastava Angular, Interview Question

Life Is Complicated, But Now programmer Can Keep It Simple.